


Solutions

Markets
References
Company
Profile
Partners
Contact

13. February 2019
Running multiple NAV/BC containers on an Azure VM
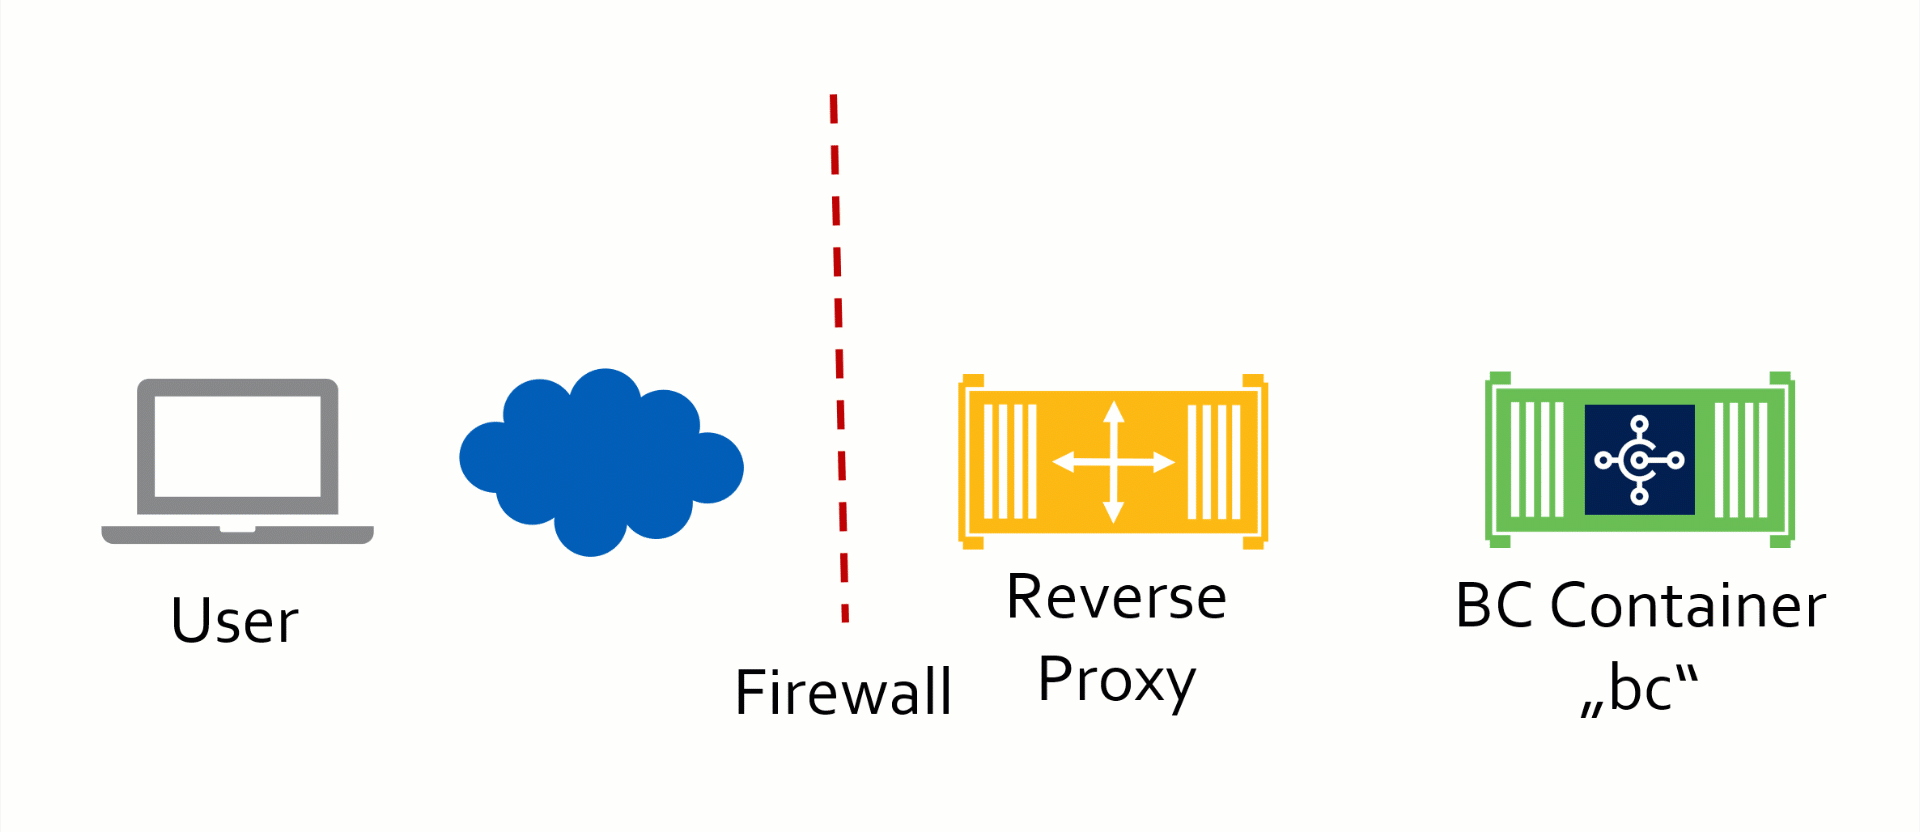
When you want to get started with using NAV/BC containers and have an Azure subscription, then the very easy route is to just use one of Microsoft’s quickstart ARM templates like http://aka.ms/getbc. This will create a VM on Azure with Docker, one pre-defined container, navcontainerhelper, VS Code and all the bells and whistles you might want. If you create a remote Desktop connection into that machine, you are also able to create new containers as needed but making them available externally (from outside the VM, using VS Code or a browser on your local machine) is a bit more tricky as it will probably involve opening ports on the Windows and Azure firewalls. But there is an easier way.
The TL;DR
Making environments behind a firewall available to the outside world is often done with a reverse proxy. This in the most basic setup is a piece of software that accepts external requests and forwards them to other systems (in our case containers) as well as talking responses from those systems and serving them back to the requester. For example if you had an Azure VM reachable as myvm.cloudapp.azure.com, it could accept a request to https://myvm.cloudapp.azure.com/bc_webclient, forward that to the Business Central WebClient inside of a container named bc on the VM and serve the response back to the caller. Click on the image below to see the animated request flow.
With that in place it is easy to add additional containers, e.g. bc1, bc2 and bc3 and let the reverse proxy handle the network traffic to and from them. With the use of Traefik as Reverse Proxy and labels on the Docker containers, this happens on the fly with no additional config.
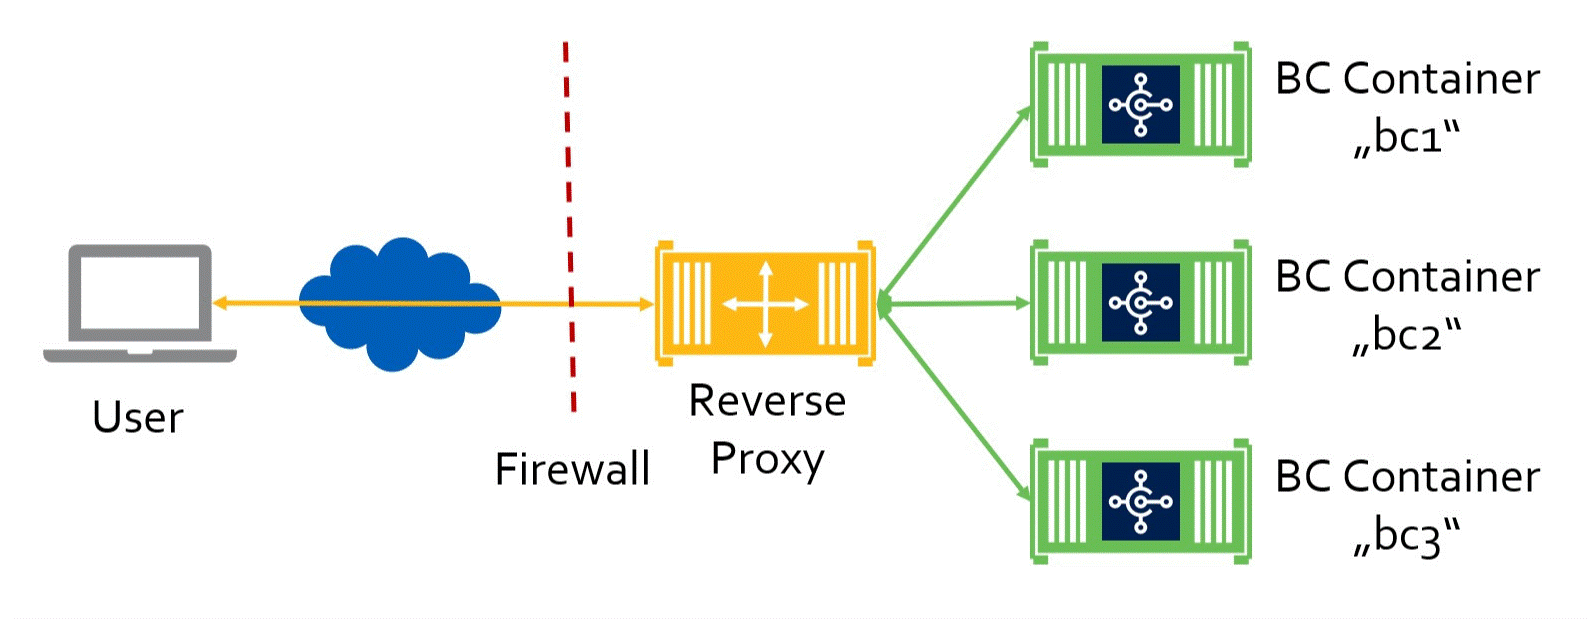
The main benefit is that Azure and Windows only have one connections through the firewall (the yellow arrow), so you only need to spin up new containers with the appropriate labels and Traefik will do its magic. You need to be aware though that this only works for http/s-based traffic, so e.g. SQL Server access from C/SIDE or connecting the old RTC Windows Client won’t work
Details about the basic setup
In order to get this up and running, we need a couple of things in place:
- An Azure VM with container support. You can either use the bare Windows Server 2019 image and install Docker on it or (as I do) you use the prebuilt Windows Server 2019 with containers image. Make sure you have opened port 80 and 443 as we will use them and also port 3389 for RDP1.
- Traefik needs a configuration file called traefik.toml where the externally reachable DNS name, the entrypoints and also your email address for getting Lets Encrypt certificates are defined. It looks like this, you would of course need to change the domain and email settings:
debug = false defaultEntryPoints = ["https","http"] [web] address = ":8080" [docker] domain = "myvm.westeurope.cloudapp.azure.com" watch = true endpoint = "npipe:////./pipe/docker_engine" [entryPoints] [entryPoints.http] address = ":80" [entryPoints.http.redirect] entryPoint = "https" [entryPoints.https] address = ":443" [entryPoints.https.tls] [acme] email = "my@emailaddress.com" storage = "c:/etc/traefik/acme.json" entryPoint = "https" [acme.httpChallenge] entryPoint = "http" [[acme.domains]] main = "myvm.westeurope.cloudapp.azure.com" - In order for everything in the container to work, we need to let it know how it is reachable externally through a config setting called PublicWebBaseUrl. This setting however is also used in the container healtcheck which makes perfect sense. The problem here is that Traefik opens routes for containers only if and when they are healthy but we are providing the PublicWebBaseUrl through Traefik. So basically Traefik asks the container if it is healthy, which asks Traefik for the connection, which won’t work because the container is not yet healthy… To solve this, I have adapted the container health check so that it uses localhost instead of the PublicWebBaseUrl:
$healthcheckurl = ("http://localhost/" + $env:webserverinstance + "/") try { $result = Invoke-WebRequest -Uri "${healthcheckurl}Health/System" -UseBasicParsing -TimeoutSec 10 if ($result.StatusCode -eq 200 -and ((ConvertFrom-Json $result.Content).result)) { # Web Client Health Check Endpoint will test Web Client, Service Tier and Database Connection exit 0 } } catch { } exit 1 - After that we can just run the traefik container, assuming that the config file etc. are stored in c:\traefikforbc. I am using one from Stefan Scherer as the official one doesn’t support Let’s Encrypt on Windows:
docker run -p 8080:8080 -p 443:443 -p 80:80 -v c:/traefikforbc/config:c:/etc/traefik -v \\.\pipe\docker_engine:\\.\pipe\docker_engine stefanscherer/traefik-windows --docker.endpoint=npipe:////./pipe/docker_engine
Traefik will automatically handle the Lets Encrypt part, so you get a valid SSL certificate with that setup as well. If you go to http://localhost:8080 inside of the Azure VM, you see the traefik admin interface.
- For your convenience, I am using navcontainerhelper to run the BC containers, so you also need to install navcontainerhelper
Shortcut to the initial setup
You can either do this manually or you download my PowerShell scripts from https://github.com/tfenster/TraefikForBC (PSGallery module to follow). Make sure to download all files (there is a convenient download button on the top right, which gives you a .zip of the full repo). With that in place, setup works like this:
Import-Module TraefikForBC.psd1 -force
Initialize-TraefikForBC -email tobias.fenster@axians-infoma.de -externaldns testme.westeurope.cloudapp.azure.com
Start-Traefik
Adding BC containers
Now everything is prepared for our Business Central containers. Those can be started as you are used to, either with a direct docker call or with navcontainerhelper. In my PowerShell scripts I am using the latter as it rightfully is used by a lot of people, so chances are you can relate to that. The only thing special here is that we need to add a couple of labels which tell traefik that it should capture traffic for this container and how it should handle the traffic. For example the redirect to the new Dev endpoint is done with the following two labels:
-l 'traefik.dev.frontend.rule=PathPrefix:/bc1dev/;ReplacePathRegex: ^/bc1dev/(.*) /NAV/$1'
-l 'traefik.dev.port=7049'
This tells traefik to take incoming requests for /bc1dev/, send them to /NAV/ to the container and add everything after /bc1dev/ to /NAV/ again. It also tells it to use port 7049 for this case. That means that a request to https://testme.westeurope.cloudapp.azure.com/bc1dev/whatever would be redirected to the container at :7049/NAV/whatever. If you want to see more how this works, check my script here https://github.com/tfenster/TraefikForBC/blob/master/TraefikForBC.psm1#L60-L93 or your local file at lines 60-93. The traefik documentation at https://docs.traefik.io/basics/#matchers is also quite good.
Starting a traefik-aware BC container with my script is a simple call:
Start-BCWithTraefikLabels -name bc1 -image mcr.microsoft.com/businesscentral/onprem -externaldns testme.westeurope.cloudapp.azure.com
After the container has started and becomes healthy, the following URLs are avaible (base url and container name of course would be different for you):
- WebClient: https://<baseurl>/<containername>/, so in my case https://testme.westeurope.cloudapp.azure.com/bc1/
- SOAP WebServices: https://<baseurl>/<containername>soap/, so in my case https://testme.westeurope.cloudapp.azure.com/bc1soap/
- OData / REST WebServices: https://<baseurl>/<containername>rest/, so in my case https://testme.westeurope.cloudapp.azure.com/bc1rest/
- Modern Dev endpoint: https://<baseurl>/<containername>dev/, so in my case https://testme.westeurope.cloudapp.azure.com/bc1dev/
- File download: https://<baseurl>/<containername>dl/, so in my case https://testme.westeurope.cloudapp.azure.com/bc1dl/
Things to note when using this
The WebClient sets a cookie on successful login. That cookie is scoped to the base URL, e.g. https://testme.westeurope.cloudapp.azure.com and therefore the same for all containers running in that setup. That also means that the cookie will be reused even if you switch e.g. from https://testme.westeurope.cloudapp.azure.com/bc1/ to https://testme.westeurope.cloudapp.azure.com/bc2/ which won’t work because that are two different containers. So in order to reliably use that, you will have to delete the cookies for this particular URL before switching to the next container or use a private browser session.
I am setting the PublicODataBaseURL and PublicSOAPBaseURL settings, but the WebServices still return wrong URLs in some places. I am not sure if this is broken, not supposed to work or I am doing something wrong. Feedback would be appreciated! Also note that the file download links will point to / instead of /bc1dl/ in my case, so in order to download files you have to copy the URL and manually adjust it. Not nice, but I unfortunately don’t see what I can change in that case
Call for feedback
If you like how this works but need other navcontainerhelper settings, please let me know and I can look into adding them to Start-BCWithTraefikLabels. I probably won’t add all of them because there are a lot, but I am happy to add the most common ones.
- Depending on your IT security setup it will very likely make sense to not open those to everyone but only to your IP or IP range, but if you don’t mind, you can also open them for everyone
RSS Feed
Contact
Contact
